Thursday 18 June 2015

ETL Architect Sample Questions


Depending on who's doing the interview and how serious they are:

-Describe advantages of the CIF architecture versus the bus architecture with conformed dimensions. Which would fit best in our environment given [some parameters they give you] and why
-Describe snowflaking
-Describe factless fact tables.
-Draw a star schema of our business
-Describe common optimization techniques applied at the data model level
-How do you handle data rejects in a warehouse architecture?
-Describe common techniques for loading from the staging area to the warehouse when you only have a small window.
-How do you load type 1 dimensions
-How do you load type 2 dimensions, and how would you load it given our [insert business particularity]
-How would you model unbalanced hierarchies
-How would you model cyclic relations
-What major elements would you include in an audit model?
-How would you implement traceability?

Wednesday 17 June 2015

Load Duplicates and Unique values in separate targets


If the source contains Duplicates,then we need to separate all the duplicate and unique records

Source TGT_DUP
col1 col2 col3 col1 col2 col3
a b c a b c
a b c m n o
d e f
m n o TGT_UNIQUE
m n o col1 col2 col3
d e f


Sunday 14 June 2015

Send Mail From Shell Script

Here we will see simple bash script to send emails using the mail command in linux operating system.

#!/bin/bash

TO_ADDRESS="recipient@domain.com"
FROM_ADDRESS="sender"
SUBJECT="Mail Server Hosting Demo"
BODY="This is a linux mail system. Linux is one of the email operating systems which can be used to send and receive emails."

echo ${BODY}| mail -s ${SUBJECT} ${TO_ADDRESS} -- -r ${FROM_ADDRESS}
We will enhance the above script to attach files, to read body from a file and specifying a list of users in CC. The enhanced mail script is shown below:

#!/bin/bash

TO_ADDRESS="recipient@domain.com"
FROM_ADDRESS="sender"
SUBJECT="linux mail send attachment example"
BODY_FILE="script.dat"
ATTACHMENT_FILE="logfile.txt"
CC_LIST="user1@gmail.com;user2@yahoomail.com;user3@earthlink.com;user4@cheetahmail.com"

uuencode ${ATTACHMENT_FILE} | mail -s ${SUBJECT} -c ${CC_LIST} ${TO_ADDRESS} -- -r ${FROM_ADDRESS} < ${BODY_FILE}

Tar Command

The syntax of tar command is

tar [options] [Archive file] [files list]

The options of tar command are:

c : creates a tar file.
v : verbose. Displays the files information.
f : Specify the tar file name.
r : updates the tar file with new files.
x : Extracts files from the archive (tar file).
t : view contents of tar file.
z : Specify the tar command to create a tar file using gzip in unix.
j : uses bzip2 to create the tar file.
1. Creating a tar file

Let see a sample example by archiving all the files in my current directory. The ls -l command displays the files and directories in the current directory.

> ls -l 
drwxr-xr-x 2 user group 4096 Aug  8 03:23 debian
-rw-r--r-- 1 user group  174 Aug  2 23:39 file
-rw-r--r-- 1 user group    0 Aug  8 03:22 linux_server.bat
-rw-r--r-- 1 user group   76 Aug  2 02:21 test.sh
-rw-r--r-- 1 user group    0 Aug  8 03:22 unix_distro

We see how to tar all these files using the -c option with the tar command. This is shown below:

> tar -cvf archive.tar *
debian/
file
linux_server.bat
test.sh
unix_distro

> ls
archive.tar  debian  file  linux_server.bat  test.sh  unix_distro
2. Printing the contents of tar file

We have created the tar file and we dont know whether it contains the actual files or not. To view the contents of the tar file use the -t option as

> tar -tvf archive.tar
drwxr-xr-x user/group   0 2012-08-08 03:23:07 debian/
-rw-r--r-- user/group 174 2012-08-02 23:39:51 file
-rw-r--r-- user/group   0 2012-08-08 03:22:19 linux_server.bat
-rw-r--r-- user/group  76 2012-08-02 02:21:32 test.sh
-rw-r--r-- user/group   0 2012-08-08 03:22:09 unix_distro
3. Updating the tar file with new contents.

You can add new files to the existing archive (tar) file using the -r option.

>touch red-hat-linux.dat

>tar -rvf archive.tar red-hat-linux.dat
red-hat-linux.dat

>tar -tvf archive.tar
drwxr-xr-x pcenter/pcenter   0 2012-08-08 03:23:07 debian/
-rw-r--r-- pcenter/pcenter 174 2012-08-02 23:39:51 file
-rw-r--r-- pcenter/pcenter   0 2012-08-08 03:22:19 linux_server.bat
-rw-r--r-- pcenter/pcenter  76 2012-08-02 02:21:32 test.sh
-rw-r--r-- pcenter/pcenter   0 2012-08-08 03:22:09 unix_distro
-rw-r--r-- pcenter/pcenter   0 2012-08-08 04:00:00 red-hat-linux.dat
4. Extracting the contents of tar file

In the first example, we have created the archive file. Now we will see how to extract the set of files from the archive. To extract the contents of the tar file use the -x option.

> tar -xvf archive.tar
debian/
file
linux_server.bat
test.sh
unix_distro
5. Creating compressed tar file

So far we have created a uncompressed tar file in the above examples. We can create a compressed tar file using the gzip 

Compressing files using gzip

> tar -zcvf new_tar_file.tar.gz *

Find Command

How to find for a file using name?

find -name "sum.txt"
./bkp/sum.txt
./sum.txt
-i can be used for case insensitive file names.

How to remove files which contain the name "java".

find -name "*java*" -exec rm -r {} \;

This will delete all the files which have the word “java" in the file name in the current directory and sub-directories.

How to find for a file in the current directory only?

find -maxdepth 1 -name "sum.txt"

Sed Command

Sed is a Stream Editor used for modifying the files in unix (or linux). Whenever you want to make changes to the file automatically, sed comes in handy to do this. Most people never learn its power; they just simply use sed to replace text. You can do many things apart from replacing text with sed. 

Consider the below text file as an input.

>cat file.txt
unix is great os. unix is opensource. unix is free os.
learn operating system.
unixlinux which one you choose.

Sed Command Examples


1. Replacing or substituting string

Sed command is mostly used to replace the text in a file. The below simple sed command replaces the word "unix" with "linux" in the file.

>sed 's/unix/linux/' file.txt
linux is great os. unix is opensource. unix is free os.
learn operating system.
linuxlinux which one you choose.

Here the "s" specifies the substitution operation. The "/" are delimiters. The "unix" is the search pattern and the "linux" is the replacement string.

By default, the sed command replaces the first occurrence of the pattern in each line and it won't replace the second, third...occurrence in the line.

2. Replacing the nth occurrence of a pattern in a line.

Use the /1, /2 etc flags to replace the first, second occurrence of a pattern in a line. The below command replaces the second occurrence of the word "unix" with "linux" in a line.

>sed 's/unix/linux/2' file.txt
unix is great os. linux is opensource. unix is free os.
learn operating system.
unixlinux which one you choose.

3. Replacing all the occurrence of the pattern in a line.

The substitute flag /g (global replacement) specifies the sed command to replace all the occurrences of the string in the line.

>sed 's/unix/linux/g' file.txt
linux is great os. linux is opensource. linux is free os.
learn operating system.
linuxlinux which one you choose.

4. Replacing from nth occurrence to all occurrences in a line.

Use the combination of /1, /2 etc and /g to replace all the patterns from the nth occurrence of a pattern in a line. The following sed command replaces the third, fourth, fifth... "unix" word with "linux" word in a line.

>sed 's/unix/linux/3g' file.txt
unix is great os. unix is opensource. linux is free os.
learn operating system.
unixlinux which one you choose.

Replacing string on a specific line number.

You can restrict the sed command to replace the string on a specific line number. An example is

>sed '3 s/unix/linux/' file.txt
unix is great os. unix is opensource. unix is free os.
learn operating system.
linuxlinux which one you choose.
Replacing string on a range of lines.

You can specify a range of line numbers to the sed command for replacing a string.

>sed '1,3 s/unix/linux/' file.txt
linux is great os. unix is opensource. unix is free os.
learn operating system.
linuxlinux which one you choose.

Here the sed command replaces the lines with range from 1 to 3. 

Deleting lines.

You can delete the lines a file by specifying the line number or a range or numbers.

>sed '2 d' file.txt
>sed '5,$ d' file.txt

courtesy:folkstalk

Target Update Override

One can perform updates in the target in mapping using 2 approaches:

  1. Using a UPDATE STRATEGY transformation
  1. Configuring Session and defining properties to "Treat all rows as UPDATE"

But both these approach works only when there is a Primary Key defined in the target table. The session will fail when there will not be any key defined in the target.

Alternatively, if you want to perform TARGET updates,  with putting condition on COLUMNs not included as PRIMARY KEY in target table, it will not be feasible with out changing the Keys on target table. i.e. If PRIMARY KEY is defined on COLUMN_A in TABLE_A and you want to Update TABLE_A with conditions on or including COLUMN_B


In such cases the UPDATE_OVERRIDE property of TARGET Object can be useful.

  • How to access UPDATE_OVERRIDE property?

  1. Go to Mapping
  1. Double Clink on the concerned TARGET or edit the Target
  1. Click on Properties Tab
  1. The second Transformation Attribute is the property we are looking for

  • Syntax for UPDATE_OVERIDE SQL:

UDATE      <TARGET TABLE>
SET            <COLUMN NAME to be updated> = :TU.<TARGET COLUMN PORT NAME (As in Designer)>   
                   , [Other columns need to be updated]
WHERE      <COLUMN NAME to be treated as KEY > = :TU.<corresponding TARGET COLUMN PORT NAME (As in Designer)>
AND          [other conditions]

  • Example:

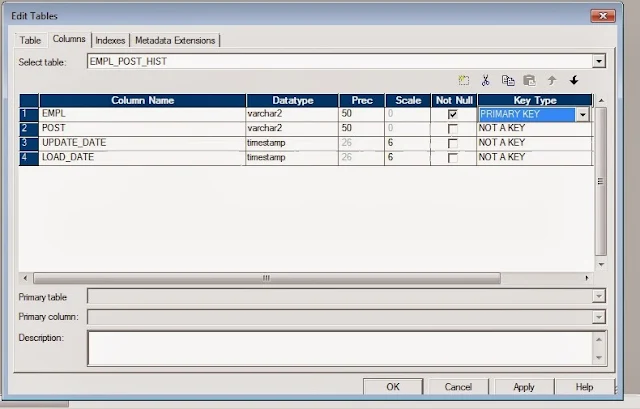
UPDATE    EMPL_POST_HIST
SET            POST = :TU.POST
                , UPDATE_DATE = :TU.UPDATE_DATE
WHERE EMPL = :TU.EMPL


Following is an example showing Problem statement and step by step Instructions, of two approaches, of suggested solution.

Problem Scenario:

  1. Target table has not defined Primary key


  1. Informatica target object has no Keys - Since the Database table has not Keys the Imported Object in Informatica will not have any Key in the Target definition


  1. Original Mapping :  The mapping created using this very Target definition


  1. Defining update logic: configuring session for UPDATE Logic 
  1. Configure session for Treat All Source Row as "UPDATE"


  1. Configure in the session target property to UPDATE as UPDATE - optional


  1. The error you will get while execution - the session will fail


Solution:


Approach 1: Using Update in the Target

  1. Go to properties tab of Target in Mapping:


  1. Edit the "Update Override" attribute - generate SQL and add where Clause with the column name on which you want to update:


  1. Please note that you need to remove the very column, used in WHERE clause from the SET Clause list 
  1. Go to Workflow and refresh changes in the mapping and save them 
  1. Execute the Workflow 
  1. Now it has successfully updated the rows:


Approach 2: Forcing Keys in the Target object definition in designer

  1. Edit the Target in the target designer


  1. Define your Primary key column. Please note that in this case the Database need not have keys defined on the same table:


  1. Save the changes 
  1. Execute the workflow 
  1. The workflow will update the records in the target table:

PMCMD Command Usage in Informatica


Informatica provides four built-in command line programs or utilities to interact with the informatica features. They are: 
  • infacmd
  • infasetup
  • pmcmd
  • pmrep
This article covers only about the pmcmd command. The pmcmd is a command line utility provided by the informatica to perform the following tasks. 
  • Start workflows.
  • Start workflow from a specific task.
  • Stop, Abort workflows and Sessions.
  • Schedule the workflows.
How to use PMCMD Command in Informatica

1. Scheduling the workflow 

The pmcmd command syntax for scheduling the workflow is shown below: 
pmcmd scheduleworkflow -service informatica-integration-Service -d domain-name -u user-name -p password -f folder-name -w workflow-name

You cannot specify the scheduling options here. This command just schedules the workflow for the next run. 

2. Start workflow 

The following pmcmd command starts the specified workflow: 
pmcmd startworkflow -service informatica-integration-Service -d domain-name -u user-name -p password -f folder-name -w workflow-name

3. Stop workflow 

Pmcmd command to stop the infromatica workflow is shown below: 

pmcmd stopworkflow -service informatica-integration-Service -d domain-name -u user-name -p password -f folder-name -w workflow-name

4. Start workflow from a task 

You can start the workflow from a specified task. This is shown below: 
pmcmd startask -service informatica-integration-Service -d domain-name -u user-name -p password -f folder-name -w workflow-name -startfrom task-name

5. Stopping a task. 

The following pmcmd command stops the specified task instance: 
pmcmd stoptask -service informatica-integration-Service -d domain-name -u user-name -p password -f folder-name -w workflow-name task-name
courtesy:folkstalk

6. Aborting workflow and task. 

The following pmcmd commands are used to abort workflow and task in a workflow: 
pmcmd abortworkflow -service informatica-integration-Service -d domain-name -u user-name -p password -f folder-name -w workflow-name

pmcmd aborttask -service informatica-integration-Service -d domain-name -u user-name -p password -f folder-name -w workflow-name task-name

Informatica Workflow Successful : No Data in target !

Stop On Errors:
Indicates how many non-fatal errors the Integration Service can encounter before it stops the session. Non-fatal errors include reader, writer, and DTM errors. Enter the number of non-fatal errors you want to allow before stopping the session. The Integration Service maintains an independent error count for each source, target, and transformation. If you specify 0, non-fatal errors do not cause the session to stop.
Optionally use the $PMSessionErrorThreshold service variable to stop on the configured number of errors for the Integration Service.
In Oracle, it is the infamous “when others then null” .


The solution to this problem in Informatica is to set a limit on the number of allowed errors for a given session using one of the following methods.
a) Having “1” in your default session config : Fail the session on the first non-fatal error.
b) Over-write the session Configuration details and enter the “Stop On Errors” to “1” or a fixed number.
c) Use the $PMSessionErrorThreshold variable and set it at the integration service level. You can always override the variable in the parameter file.